DiCaControl for Windows
What is DiCaControl?
You own a Casio 'QV' digital camera and a Windows PC?
You want to remote control the camera with a serial cable?
May be DiCaControl is what you are looking for!
DiCaControl is a small freeware tool to remote control your Casio digital camera. It works with these Casio models:
- QV-2000UX
- QV-2300UX
- QV-2400UX
- QV-2800UX
- QV-2900UX
- QV-3000EX
- QV-3500EX
- QV-4000
- QV-5700
- QV-8000SX
DiCaControl needs a serial connection to a "DIGITAL" port at the camera, it can not control the camera through a USB connection.
If the camera model can be remote controlled by a Casio wired remote control it can be remote controlled by DiCaControl. Because some Casio camera models do not offer a "DIGITAL" port they can't be controlled by a Casio wired remote control or by DiCaControl.
Therefore DiCaControl does NOT work with these Casio models:
- All EXILIM models
- QV-R3
- QV-R4
- GV-10
DiCaControl provides all functions you have by direct access of the camera - but it allows you to control the camera without touching it.
This can be useful if you want to take a sequence of pictures with exactly the same camera position without disturbing the position by touching the camera, usually done by fixing the camera on a tripod.
DiCaControl provides functions to take time lapse pictures - series of pictures with a constant interval time span between the 'shots'.
It supports the undocumented 'Bulb' feature of some cameras and allows to define a 'bulb period', the time between open and close the shutter.
DiCaControl can download the latest taken picture to your PC periodically after each shot of an interval picture - assuming there is a further connection with a USB cable and you got a new QV model with support of switching to 'USB mode'.
The old models QV-2000UX and QV-8000SX don't support this.
The download can be followed by other external commands. For example the picture file can be downsized and transfered to a web server - so your Casio camera can be used as a web cam.
DiCaControl works with different Windows versions and needs a Casio serial cable for the connection to the camera.
Main functions
The first 'page' ('Direct Control') is dependent of the camera model you defined prior on the 'Config' page.
So it will appear in different looks, related to the layout of the camera:
QV-2000UX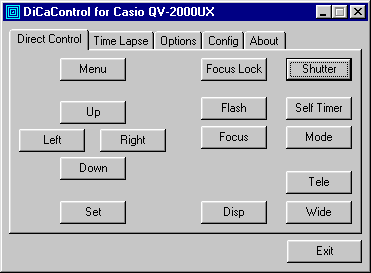 | QV-2300UX, QV-2400UX, QV-2800UX, QV-2900UX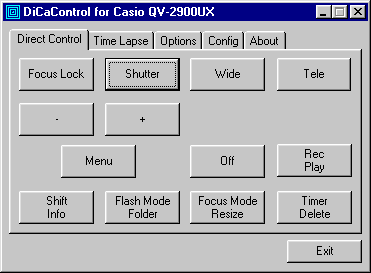 |
QV-3000EX 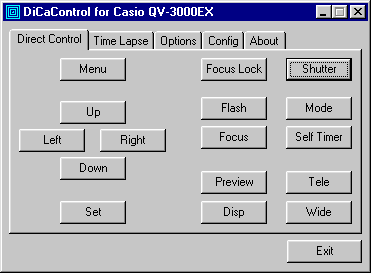 | QV-8000SX 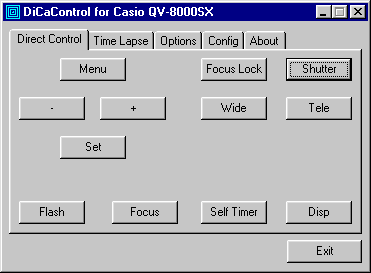 |
QV-3500EX 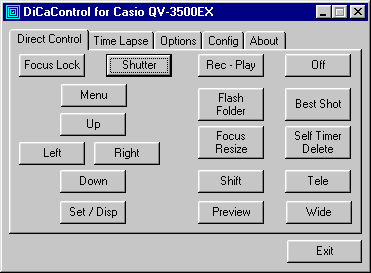 | QV-4000, QV-5700 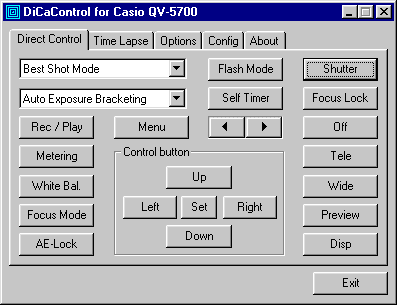 |
Here is a table of the main functions DiCaControl supports. Nearly every function is explained in more detail in the User Manual you got with your Casio camera. The functions are in a direct relationship to the buttons the camera provides. Every function is mapped to a button. Keeping a button pressed results in a continuous working, for example keeping the 'Tele' button pressed means the zoom function will work until the button is released.
| Function | Comment |
| Menu | Access to the camera menu. |
| Up, Left (-), Right (+), Down | Navigating through the camera menu, setting exposure compensation, manual focus. |
| Set | Fix last setting. |
| Focus Lock | Focus and lock the focus. This is equivalent to perform a 'half pressed' shutter at the camera. Let this command be followed by pressing the 'Shutter' button or by another press of the 'Focus Lock' button to cancel the operation. |
| Shutter | Release the shutter. |
| Flash | Rotating setting of: Automatic, On, Off, Redeye Reduction. |
| Mode | Access to the different exposure modes. |
| Focus | Rotating setting of: Automatic, Manual, Infinity, Macro. |
| Self Timer | Rotating setting of: None, 2 sec., 10 sec. |
| Tele | Zoom in. |
| Wide | Zoom out. |
| Disp | Display setting. |
| Rec - Play | Switch between Record and Play mode. Only QV-3000EX, QV-3500EX, QV-4000 and QV-5700. |
| Off | Switch the camera off. QV-3500EX has to be at PLAY mode. |
| Exit | Saves settings and closes the program. |
Time lapse functions
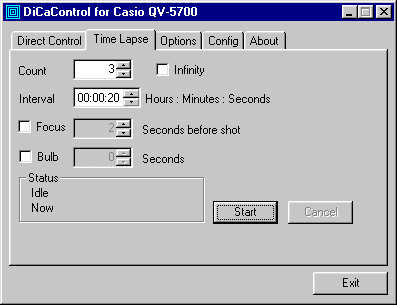
This is the second page of DiCaControl. Following functions are provided:
| Function | Comment |
| Count | The setting for the amount of pictures. |
| Infinity | Check this switch on to go in an infinity interval mode. The setting of 'Count' will be ignored. |
| Interval (Hours, Minutes, Seconds) | Here are the settings done for the time span the program waits between taking 2 pictures. |
| Focus | Choose the amount of a time span in seconds the 'Focus Lock' function is activated before the shutter is activated. 'Focus Lock' means a half pressed shutter button of the camera. |
| Bulb (Seconds) | Check this box if you want to define a time span between open and close of the shutter. Use the 'Seconds' field in the same line to define the duration. Make sure the camera is set in 'bulb' mode. To do so, follow these steps: At the camera activate 'Mode', go to 'S Mode', keep the 'Down' button pressed until a shutter time of 2 seconds is shown, press the 'Set' button while holding the 'Down' button and keep the 'Down' button pressed until 'BULB' is shown on the rear LCD display of the camera. |
| Status | A two line status information. The first line shows informations like 'Picture 3 of 15 taken', the second line displays date and time the information in the first line was generated. |
| Start | Press this button to launch a sequence of shutter commands. |
| Cancel | During a sequence of pictures press this button to cancel the sequence. During an interval the program is in a 'doze' mode and does not recognize any user input. At the end of the interval the cancel request will be recognized and the 'Status' information will show an information like 'Idle (4 Pictures taken, cancelled)'. |
| Exit | Saves settings and closes the program. |
Long intervals
DiCaControl allows you to make long time lapse sequences. Take care, the camera goes in sleep mode when a time of no action is reached! For example the Casio QV-3000EX allows settings for 'Sleep' and for 'Auto Power Off' (see MENU -> Options -> Power Save).
Set 'Sleep' to 'Off' and set 'Auto Power Off' to 5 minutes.
If the camera went into 'Auto Power Off' state it is not possible to wake it up via the serial line!
So DiCaControl will fail to send a shutter command if the camera switched itself off.
If you are considering to take intervals greater than 5 minutes it is necessary to connect the camera to an AC adapter. This will set the camera in a mode it will not go in 'Auto Power Off'.
Options
This is the third page of DiCaControl. Following functions are provided:
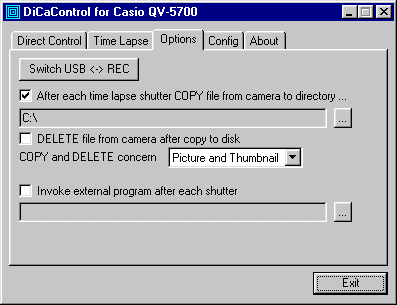
| Function / Setting | Comment |
| Switch USB <-> REC | This button is useful to check and toggle the USB connection. You need a USB connection if you want to transfer the latest taken picture to the PC after shooting the picture. Press this button and take a look to the upper LCD display of the camera. Multiple presses of the button should result in a toggle of the camera display between 'Battery state and number of free pictures' (meaning REC mode) and 'USb' (meaning USB mode). Make sure the camera displays 'Battery state and number of free pictures' if you want to remote control the camera. If the camera display shows 'USb' the camera does not accept remote control commands (exception: 'Switch USB <-> REC'). This button is disabled if the camera model is a QV-2000UX or QV-8000SX because these models don't provide a switching between REC and USB mode. |
| After each shutter COPY ... | If this switch is ON you should choose a directory using the small button at the right side of the following grey text field to determine the directory to where picture files are transferred after each shot. This switch is disabled if the camera model is a QV-2000UX or QV-8000SX because these models don't provide a switching between REC and USB mode and therefore the program can't download picture files via USB. |
| DELETE file from camera ... | If this switch is ON and you choosed to copy files from the camera to the PC (see above) the picture file which was transferred to the PC will be deleted in the camera after the copy action (meaning a 'move' action). This is useful if you take multiple (or 'infinity') pictures to make free room on the camera storage (Compact Flash Card or MicroDrive). This switch is disabled if the camera model is a QV-2000UX or QV-8000SX because these models don't provide a switching between REC and USB mode and therefore the program can't delete picture files via USB. |
| COPY and DELETE concern ... | This switch concerns the behaviour of the settings 'After each shutter COPY ...' and 'DELETE file from camera ...'. The camera creates 2 picture files: the original picture and a thumbnail picture located in the PREVIEW folder. The setting of this switch determines which files are concerned by the actions of COPY and DELETE. 3 values are available: - Picture and Thumbnail - Picture only - Thumbnail only This switch can be useful if the taken pictures are used for web pages. In this case it can be a good idea to copy only the small thumbnail file to the PC to reduce the download time. |
| Invoke external program ... | If this switch is ON you should choose a batch (*.BAT) or program (*.EXE) file using the small button at the right side of the following grey text field to determine the external program/batch which is executed after each shot (and after the picture file is transferred). Example: You can configure a batch file for 'post processing' like resize or file transfer (FTP). So you can use the camera as a web cam (not for QV-2000UX or QV-8000SX). See chapter Postprocessing for an example. |
| Exit | Saves settings and closes the program. |
Configuration
This is the fourth page of DiCaControl. Following functions are provided:
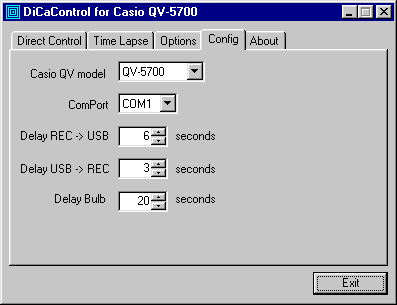
| Setting | Comment |
| Caso QV model | Set here the Casio camera model you own. Possible values are:
After changing the value you will be asked to restart the program to let the changed value get in effect. |
| ComPort | Choose a setting related to the port you connected the serial cable to the PC. After switching to a new setting the program tries to open the port. Make sure the port is not opened by another program. If the port exists and it is not not opened by another program a success message appears. If not, an error message will appear. Opening successful does not mean a communication to the camera had be done - it only means the PC port could be used without a problem. |
| Delay REC -> USB | If you want to transfer picuters from the camera to the PC (see 'Options', 'After each shutter copy ...') the camera switches its mode. There are 2 modes: REC and USB. In REC mode the camera accepts commands sent through the serial (RS232) cable. In this REC mode the camera is not able to transfer pictures to the PC through the USB cable. In USB mode the camera is able to transfer pictures through the serial cabel but it is not able to accept remote control commands. So it is necessary to switch between this 2 modes. These switches need time - the time is configured here. This field is disabled if the camera model is a QV-2000UX or QV-8000SX because these models don't provide a switching between REC and USB mode. |
| Delay USB -> REC | Similar 'Delay REC -> USB'. Used by switching the mode from USB to REC. This field is disabled if the camera model is a QV-2000UX or QV-8000SX because these models don't provide a switching between REC and USB mode. |
| Delay Bulb | After taking a 'Bulb' picture the camera needs time to do the internal save. Allow the camera to take the delay you configure here before the control program sends the next command. |
| Exit | Saves settings and closes the program. |
About
This is the fifth page of DiCaControl. Following functions and informations are provided:
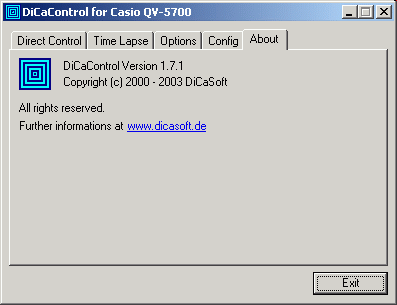
| Function / Setting | Comment |
| DiCaControl Version ... | This informs you about the version of the program. |
| www.dicasoft.de | Opens your browser at the DiCaSoft web page |
| Exit | Closes the program. |
Post processing
As mentioned above ('Options' - 'Invoke external program ...) it is possible to define a command to be invoked after each shutter action.
The external command is called with the following parameters:
| Number | Parameter meaning |
| 1 | Counter |
| 2 | Total Count |
| 3 | Date |
| 4 | Time |
| 5 | Filename of latest picture |
A simple command could be a batch file for logging the actions.
Here's a suggestion of the content of a batch file (name it LOG.BAT):
echo Date: %3, Time: %4, Picture %1 of %2 taken (File: %5) >> DICALOG.TXTThis example creates a file with the name DICALOG.TXT.
Every time a picture was taken a line is appended to this log file, in a format like this:
Date: 26.10.2002, Time: 21:40:22, Picture 2 of 3 taken (File: 10260014.JPG)Web cam
An example how a 'post processing' could make your camera to a web cam is here.
This example does:
- Create a log file entry
- Copy the latest taken picture file to a file with constant file name
- Resize this file (downsize)
- Open a dialup connection to an ISP
- Copy the resized file to a web server with FTP
- Close the dialup connection
What can be done with time lapse picture sequences?
Did you see "Chicken Run" or one of the "Wallace and Grommit" movies?
If yes, you could imagine the possibilities of a camera, fixed on a tripod, connected with a remote controlled shutter to avoid any disturbance by touching the camera.
Using DiCaControl you are able to produce small animations/movies, stitching the pictures together to a small movie.
One example of such a tool is VideoMaker or Slide Show Movie Maker. There might be other tools for this job too.
There could be usage in art (animations) or science (think at biological or technical processes).
The Palm makes you independent from a PC and increases the mobile usage possibilities.
System requirements
DiCaControl will run on all 32-bit MS Windows operating systems 95 / 98 / NT 4 / 2000 / ME / XP.
After installation DiCaControl needs only small disc space on the PC (about 76 kBytes).
There will be some other needs:
- A Casio serial cable, usually included with the camera.
- A Casio USB cable is needed if you want to do a file transfer of the last taken picture to the PC.
- A proper installed Casio USB driver is needed. Of course the Windows version needs to support USB.
- 'Windows 95' and 'Windows NT' do not support USB.
To install DiCaControl do the following steps:
- Download 'CtrlW171.zip' from here (24.293 bytes, ZIP archive, content is 'DiCaCtrl.exe').
- Save the file somewhere on your hard disk.
- Compare the file size on your hard disk with the file size mentioned above to ensure you got no problems during download.
- 'Unzip' the file to obtain 'DiCaCtrl.exe'. You should be familiar with unpacking a ZIP archive, aren't you?
- Connect your PC to the camera with the Casio serial cable.
- Switch the camera ON in position 'REC'.
- Start 'DiCaCtrl.exe'.
- In 'DiCaControl' go to 'Config' and set the 'ComPort' to the setting related to the port you connected the serial cable to the PC.
- Go to the first screen of 'DiCaControl', push one of the buttons and prove if the button press results in the corresponding camera action.
- If the camera doesn't accept the command prove the serial cable connection.
If you are interested to download the latest taken picture to your PC do the following steps:
- Connect the camera with the Casio USB cable to the PC.
- Check if 'PhotoLoader' is running. If it is running, close it.
- Look to the system tray and check if the PhotoLoader symbol appears there.
If the symbol can be viewed close the program (check with a right click). - In 'DiCaControl' go to the 'Options' page. Press the button 'Switch USB <-> REC' and take a look to the upper LCD display of the camera. Multiple presses of the DiCaControl button 'Switch USB <-> REC' should result in a toggle of the camera display between 'Battery state and number of free pictures' and 'USb'.
Make sure the camera displays 'Battery state and number of free pictures'. If the camera display shows 'USb' the camera does not accept remote control commands (exception: 'Switch USB <-> REC').
Documentation
This is the complete documentation. There are no other parts of documentation.
If you lost this documentation you can get an actual version on www.dicasoft.de.
You need a serial cable!
'DiCaControl' needs a connection to the Casio camera by a 'Casio serial cable'.
Take care - a 'Casio serial cable' is a very special item!
This cable is not only a piece of wire with two plugs, no - there's some 'electronic intelligence' in it!
Most of the Casio digital cameras are delivered with such a serial cable.
But - it seems Casio goes USB and in future there will not be such a cable in the box of a Casio camera.
Starting with the QV-4000 camera model Casio retired the serial cable from the delivery box. :-(
May be you got a QV-4000 or a QV-5700. And may be you are interested in 'DiCaControl'. Then you will need a 'Casio serial cable'.
Licensing, Copyright, Costs, Disclaimer
DiCaControl is freeware. There are no costs. Using DiCaControl needs to accept the DiCaSoft License Agreement.
Usage of DiCaControl is at own risk. DiCaSoft will not be responsible for any damage that might occur to the camera using the application or this documentation.
Version History
Version | Release date | Remarks |
1.0 | October 27, 2000 | The first release of 'DiCaControl for Windows'. |
| 1.1 | October 31, 2000 | - Button 'Preview' added. - Bugfix: Interval hours can be set to 0 even at 12 hour format. |
| 1.2 | November 19, 2000 | Additional support of other Casio models. 'DiCaControl for Windows' now supports: QV-2000UX QV-2300UX QV-2800UX QV-3000EX QV-8000SX |
| 1.3 | December 12, 2000 | Added switch 'COPY and DELETE concern ...' to 'Options' page. |
| 1.4 | October 31, 2001 | Added support of QV-3500EX. |
| 1.5 | November 11, 2001 | - Added support of QV-4000, QV-2400UX and QV-2900UX. - Windows 2000: The dialog 'Unsafe removal of device' is removed. It appeared when switching from 'USB' to 'REC' mode during time lapse processing or by pressing the 'Switch USB <-> REC' button. |
| 1.5.1 | November 13, 2001 | Small improvement. In case of an error while taking time lapse pictures the 'Unsafe removal of device' dialog is now suppressed. |
| 1.6 | November 18, 2001 | Added features to QV-4000. Now there are 24 controls. (The versions 1.5 and 1.5.1 of DiCaControl had only 6 controls like the wired control WR-3C.) |
| 1.6.1 | November 30, 2001 | QV-4000: DiCaControl remembers the last settings of the 2 combo boxes for exposure mode ('Manual Exposure', 'Shutter Speed Priority AE', ...) and drive mode ('Auto Exposure Bracketing', 'Continuous Shutter recording', ...). |
| 1.6.2 | November 30, 2001 | QV-3500 / Versions 1.6 and 1.6.1: The buttons "Set / Disp" and "Best Shot" don't work. Reason: An internal renumbering of control IDs was responsible for this bug. The bug is fixed with this version 1.6.2. |
| 1.6.3 | April 15, 2002 | Command check re-published. See chapter 'Other Casio models' on Casio QV remote controls for details. Added Hyperlink function on About page. |
| 1.7 | November 1, 2002 | - Support of QV-5700. - QV-4000: Protocol change for command "Change USB/REC" (fix). |
| 1.7.1 | June 10, 2003 | QV-4000 and QV-5700: Protocol change for command "Change USB/REC" withdrawn (fix of fix). |
How to identify the version of the installed DiCaControl
- Running DiCaControl activate the 'About' page.
- On this page the version number and copyright informations are shown.